festy's Alfa Romeo Alfetta GTV

Post Your Delco Powered Ride Here
User avatar
festy
Posts: 1039
Joined: Sat Apr 30, 2011 6:27 pm
cars: Alfa Romeos
Location: Narellan, NSW

Re: festy's Alfa Romeo Alfetta GTV

Post by festy »

I've got double fire set to start at 6ms and stop at 3ms.
At warm idle the injector bpw is between 2.5 and 3, so it's double fire as soon as the throttle is cracked and single fire when it returns to idle.

I was giving mrfiat a hand with some fine tuning yesterday - originally we'd set his dekka 60s to single fire only, but injector DC was getting up to near 40% @ 10 psi boost so we set it for single fire below something like 1.5ms and double fire above that and it seemed to work well so we chucked more boost at it and raised the rev limit :mrgreen: so the single/double fire settings were the first thing I checked on mine this morning (after the fan settings that is...)
Probably not really necessary to set mine up for single fire at idle, but mrfiat gave me his old 34lb injectors so when I swap those in it might come in handy.

And the oil leak is coming from... the timing cover
I've re-tightened everything and am about to go and see if that's fixed it, or whether I'm pulling it all apart again :(
User avatar
Holden202T
Posts: 10311
Joined: Sat Feb 28, 2009 9:05 pm
Location: Tenambit, NSW
Contact:

Re: festy's Alfa Romeo Alfetta GTV

Post by Holden202T »

yeah the single fire option is really handy at idle for big injectors, I have the same settings with deka 80's and methanol, need single fire below 3ms i think it is to get it to idle a bit better with the garden hose fittings :)
User avatar
festy
Posts: 1039
Joined: Sat Apr 30, 2011 6:27 pm
cars: Alfa Romeos
Location: Narellan, NSW

Re: festy's Alfa Romeo Alfetta GTV

Post by festy »

After ignoring the car for a week or two the gasket fairy still hadn't snuck in one night and fixed it for me, so I started pulling it all apart again myself :cry:

Well I think I found the problem :wtf:
timing_gasket1.jpg
timing_gasket1.jpg (148.46 KiB) Viewed 6293 times
That o ring is for the main oil passage, that's the oil pump outlet. There should probably be a hole in the gasket to accommodate that...
timing_gasket2.jpg
timing_gasket2.jpg (74.51 KiB) Viewed 6293 times
Obviously my oil pump works (or at least did) - it made enough pressure to *just* blow a small hole through the gasket. That explains why I couldn't stop the leak at least.
User avatar
Jayme
Posts: 2585
Joined: Sun Mar 01, 2009 8:59 am
Location: North Coast, NSW

Re: festy's Alfa Romeo Alfetta GTV

Post by Jayme »

well thats a useful gasket..... was it a purchased brand name one? I Assume it must fit various models hence the rather important hole missing?
User avatar
Holden202T
Posts: 10311
Joined: Sat Feb 28, 2009 9:05 pm
Location: Tenambit, NSW
Contact:

Re: festy's Alfa Romeo Alfetta GTV

Post by Holden202T »

yeah that's not going to work too well!
User avatar
festy
Posts: 1039
Joined: Sat Apr 30, 2011 6:27 pm
cars: Alfa Romeos
Location: Narellan, NSW

Re: festy's Alfa Romeo Alfetta GTV

Post by festy »

Jayme wrote:well thats a useful gasket..... was it a purchased brand name one? I Assume it must fit various models hence the rather important hole missing?
I bought it from one of the largest Alfa parts shops in the US. It came with one left side gasket and 2 vastly different right side ones - the other one was completely different whereas this one lines up on the studs and the water jacket etc matches - it's just this one pesky hole that's in the wrong spot.
As far as I know this engine used the same timing cover (and block) from the 60s onwards so no idea what's happened here.
I'll send them the pics and see what they say about it :rant:
User avatar
festy
Posts: 1039
Joined: Sat Apr 30, 2011 6:27 pm
cars: Alfa Romeos
Location: Narellan, NSW

Re: festy's Alfa Romeo Alfetta GTV

Post by festy »

I got a reply from the shop, they agreed that the gasket wasn't the right one for the engine but couldn't offer much of an explanation or solution :oops:
They did offer me a store credit for the $6 I'd paid for the gasket though, but didn't have any other types than what they'd sent me.

So I bought a roll of 0.8mm jointing paper from my local parts shop then spent half an hour making a couple of hole punches from whatever I could find and made my own gasket.
The two gaskets on the right are the ones I bought, the one on the left is mine:
new_gasket.jpg
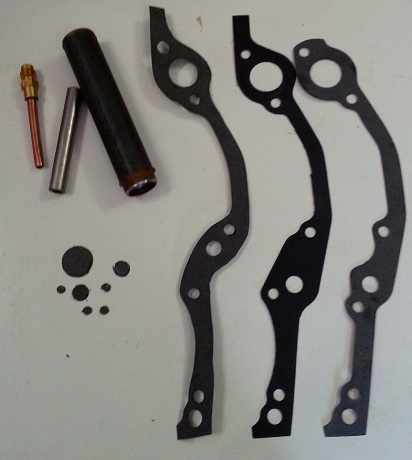
new_gasket.jpg (65.46 KiB) Viewed 6235 times
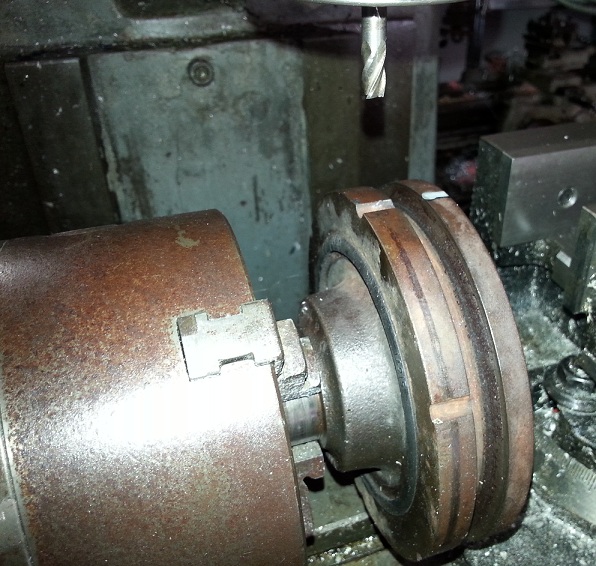
While the harmonic balancer was off I took the opportunity to clean up the trigger notches a bit.
When I originally cut them I marked them out with a printed template then clamped the HB face down to my mill table and cut the notches with a 1/4" end mill so they had rounded bottoms rather than a square profile.
Since cutting them I've acquired a rotary table, which makes the process a million times easier and more accurate.
CAS2.jpg
CAS2.jpg (173.04 KiB) Viewed 6235 times
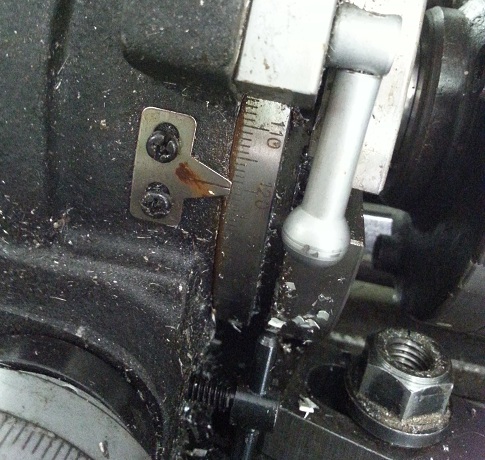
One of the notches was right on the TDC timing mark, so dial that in as 0*
CAS1.jpg
CAS1.jpg (148.74 KiB) Viewed 6235 times
The original notches were pretty close, at 120* they were still dead on but I did find one that was about 4* out. I was re-cutting them slightly wider, so managed to bring that down to about 1.5* out.
CAS3.jpg
CAS3.jpg (113.41 KiB) Viewed 6235 times
Now they're all equal depth and width, with a nice square profile
CAS4.jpg
CAS4.jpg (115.49 KiB) Viewed 6235 times
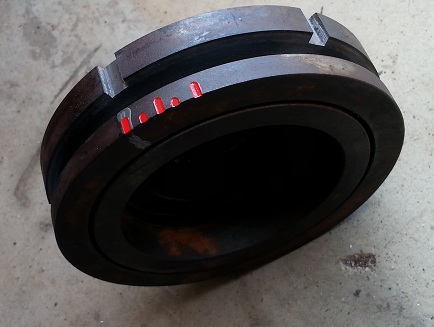
Then I thought seeing as I had the rotary table set up, why not add a couple of timing reference marks so I can work out what my actual reference angle should be set to.
I dug out my smallest endmill and very cautiously engraved a mark at 0*, then 10* and then 20*. I was sure the tiny endmill was going to snap at any moment but it hadn't yet, so I threw caution to the wind and went back to quickly add 5 degree marks too.
After I finished the last one I grabbed some red enamel and filled the marks, and that was when I noticed I'd cut them at 0, 5, 10, 14 and 20 degrees :rant:
Oh well, I really only need the 0* and 10* marks anyway...
misseditbythatmuch.jpg
misseditbythatmuch.jpg (49.22 KiB) Viewed 6235 times
User avatar
festy
Posts: 1039
Joined: Sat Apr 30, 2011 6:27 pm
cars: Alfa Romeos
Location: Narellan, NSW

Re: festy's Alfa Romeo Alfetta GTV

Post by festy »

When I was putting the radiator back in I noticed that the thermo fan's bearings had a bit of a growl, so made up some brackets to mount a smallish ebay fan that I had left over from something else.
It weighs a lot less and seems to move roughly the same amount of air, so will see if it will do the job.
If not I'll either add a second one or get a larger fan but it's not like this car will ever be stuck stationary in traffic...
thermo2.jpg
thermo2.jpg (228.74 KiB) Viewed 6233 times
User avatar
Holden202T
Posts: 10311
Joined: Sat Feb 28, 2009 9:05 pm
Location: Tenambit, NSW
Contact:

Re: festy's Alfa Romeo Alfetta GTV

Post by Holden202T »

plenty of good progress here :) spewing about that one notch, the rest looks mint though!

i do envy your shed toys!
User avatar
vlad01
Posts: 7803
Joined: Mon Oct 08, 2012 6:41 pm
cars: VP I S
VP I executive
VP II executive
VP II executive #2
VR II executive
Location: Kyneton, Vic

Re: festy's Alfa Romeo Alfetta GTV

Post by vlad01 »

i wish i had a mill, or at least a lath. So hard to find any around here that aren't 3 phase and affordable 2nd hand.
I'm the director of VSH (Vlad's Spec Holden), because HSV were doing it ass about.
Post Reply