Gearbox is filled with Dex 3 now right or wrong.
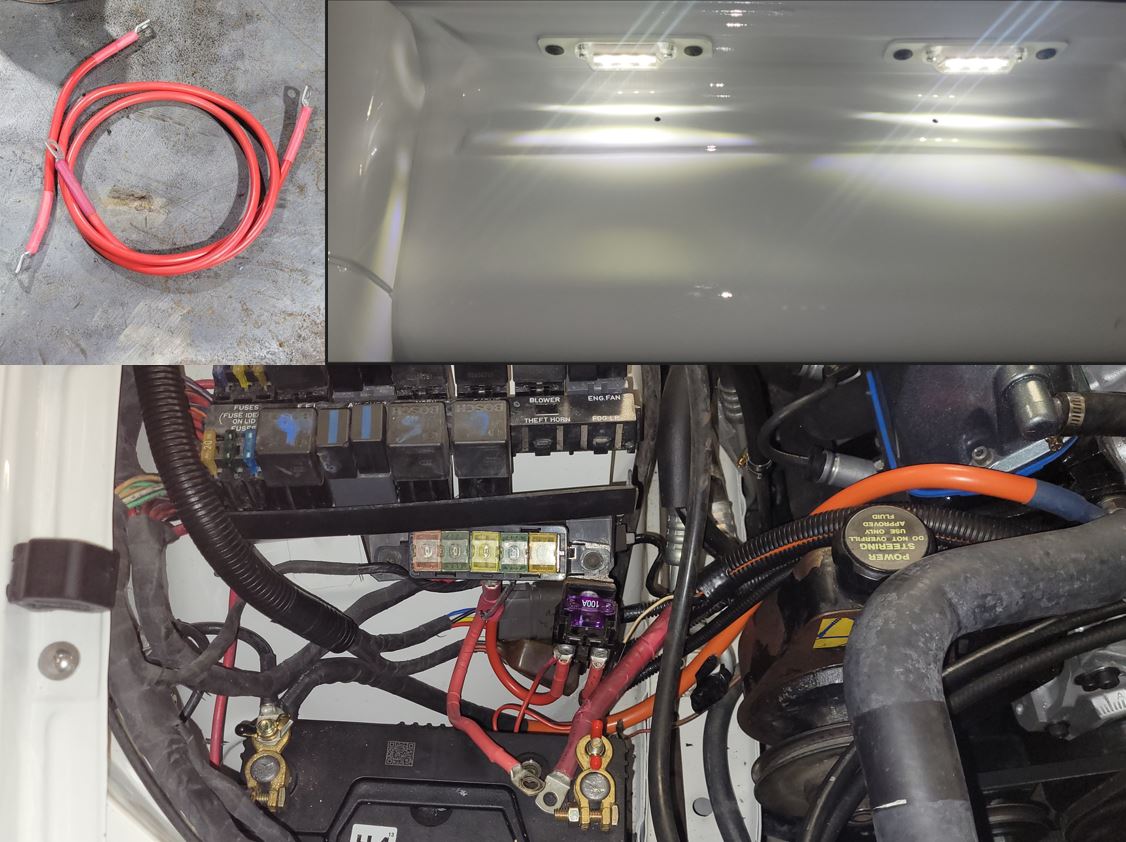
This is the upgraded wiring for the alternator. I know in some vehicles there can be a decent voltage drop across this wire so hopefully this won’t happen here and along with the Maxifuse it’s another dodgy issue with this ute put to bed. 100 amp fuse was the biggest they had locally so that’s what in it for now. I am also not a big fan of having heaps of terminals mounted on the battery positive, so have tried to minimise this and have since crimped the two wires in the one lug. Another way is to run a battery isolator switch if you have the room, but I have made this area too cluttered already by upping the size of the cables – and to be honest I think I have made it look very untidy compared to the factory offering.
I will probably cover that orange earth cable in black heat shrink as it definitely does look out of place.
Another thing I found wrong with this ute was the lights. Apart from the blue H4s and the H1s jammed in the high beams, this ute also had no number plate lights. One light assembly was missing, and the light that was fitted definitely wasn’t from a Commodore. But it was never going to work as the terminals had been cut off so nothing was connected. So I have mounted some generic LEDs in there instead which will get rid of the factory festoons. I don’t think it looks too out of place.
- Alternator Wiring.JPG (145.88 KiB) Viewed 8337 times
Catch Can is all plumbed in. Same again I’ve ended up making it very untidy at the back of the engine as I ran 3/8” tubing so there now 4 hoses running through underneath the bananas. That and the wiring harness all make it look cluttered at he back.
Wiring to the coil has been extended to the LH strut tower and just using an old ignition lead from the coil to the dizzy cap. Ignition module is just what came with it, but might swap this out with something known. I was intending to get one of Neil Prossers modules, but it looks like he’s no longer doing them.
The wiring to the O2 sensor was a little on the short side so made up an extension loom for it and now the wiring runs behind the starter motor to keep it away from the exhaust.
Had heaps of dramas with the door handles but got there in the end. Anyone who says they are easy must have smaller hands than me. Replaced the all locks in the doors and ignition switch so everything is keyed the same. Can’t say the door seals are a lot of fun either. Or the door glass. Central locking, power windows and mirrors were all working fine after all the wiring changes but the driver’s door lock actuator has decided to pack it in now so will be up for a replacement. Not sure but I believe that all the actuators are the same in the doors, so the wrecked wagon should still have a rear door actuator that would do.
Exhaust wise I have just refitted the dodgy 2.5” single system. There were a lot of storms around at the time and the dawg is terrified of thunder, so she thought it would be as good a time as any to get in the way.
Still undecided about a twin 2.5” or a single 3” but what’s there now will have to do for the time being. There’s not a lot or room to get two pipes over the diff but it can be done, but either way I would be going for a twin cat set-up. Some Maloo’s had a 2.25” twin system from the factory, but it still came from a single cat. I think the mid-section of a VS Statesman would fit, but I’ve had a hard enough time trying to find the bits I needed so finding a decent twin cat exhaust off a Statesman is just not going to happen. I have heard you can adapt the VT VY centre exhaust sections to the VN VS but it’s probably more work than its worth. I also considered that maybe 2 x single Redback catback mid sections could be laid up under there with the RH one upside down, but they slope down after the cat so that wouldn’t work either – either option would have been a good start to a twin system though. But it looks like a new exhaust will be a trip away to get something made up.
 Viewed 8337 times")
After the discussion on here about gaskets, thought I’d post this up.
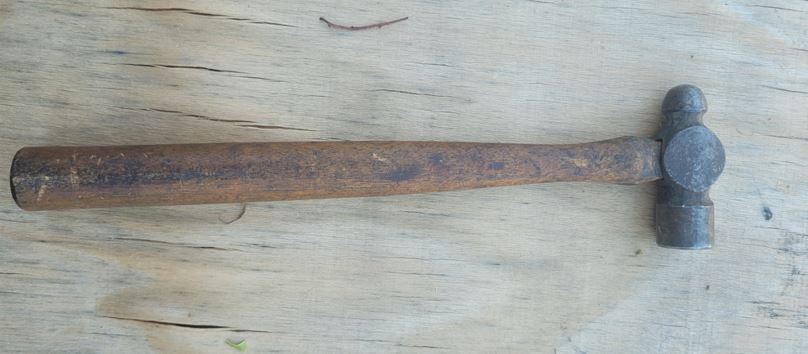
I had to make the throttle body gasket and they are not that hard to make. Grab yourself a 3 or 4oz hammer and a small sheet of marine red or Klinger – there’s heaps of options for gasket paper - and it’s easy enough to just tap them out.
In a past life this hammer has knocked out literally 100s of gaskets from timing covers to water pumps, manifolds, sumps, engine covers and exhausts.
- Gasket Hammer.JPG (44.2 KiB) Viewed 8337 times
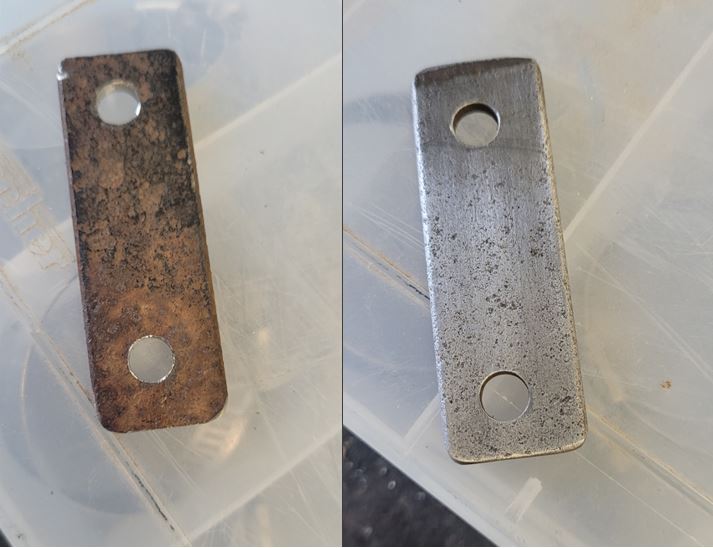
As a side note, I had to make a few brackets so did a little test on some rusty steel. I soaked this piece in CRC Evaporust for a few days then lightly cleaned it up with scotchbrite.
I rate it – it would work pretty good for small parts you can soak.
- CRC.JPG (49.04 KiB) Viewed 8337 times
Cooling system is full of rain water for now until all the gaskets settle in and will flush that out once it’s had a bit of run time.
Oil wise I am just running Penrite 15W40 Running in oil.
You see/hear of a few people having issues priming Holden v8 oil systems. I have absolutely nothing against packing the gears with Vaseline or assembly grease as this works (and have used the Vaseline in the past myself). But I now use a weed sprayer, which is not my idea, but I think it’s great - it’s cheap, it’s simple and effective and it works. I just bought the cheapest half decent one I could find at Bunnings.
I have an old remote oil filter adapter and use that to connect up to the oil pump in place of the filter and reverse flow oil back through the pick-up to prime the suction - I rotate the engine anti-clockwise back a little as the oil is going in. And with the same adapter, I pressure feed the rest of the oil through the other fitting to prime the oil galleries – so long as the oil is clean this does no harm and I figure the engine won’t make any pressure until the galleries are full anyway. But I leave the priming until the last minute so the oil doesn’t completely wash away all the assembly lube. I am certainly not infallible but the weed sprayer works. I think half the problem is the oil has to go turn up from the pick-up then down into the pump suction. So this dead leg is the part you need to prime which if using Vaseline you haven’t filled that section with oil at all. But any leak on that gasket between the block and the pick-up and the shows over.
I have a mate who has just primed his 304 with a weed sprayer just in through the oil pressure sender hole with the filter in place and it did the lot including the suction in one hit without barring the engine over backwards. With the timing cover off, and cam chain and pushrods removed, he spun the cam with a socket in a cordless drill and confirmed he had oil pressure so clearly it worked.
Anyway that’s Holden v8s for you. No engine is perfect. Everyone might have their own particular method of what works for them and the weeds prayer works for me.
But…..
I have gone for a start on the engine. I have zero experience with 12P and my only MAP based tuning was on a Motec and too long ago – so thanks to the invaluable help from this forum, I have loaded a bin that I thought would be close and primed all the injectors. It fired first crank and ran but I shut it down as no oil pressure on my mechanical gauge! Turned out the quick connect fitting for the gauge was stuck, so tried another gauge and hose. Restarted it and an instant 60 psi pressure so all good. Ran it for a bit and it was very lean and unstable. Went through looking for something dumb that I have done like vacuum hoses I might have left off, and checked fuel pressure. Tried changing the tune but wasn’t getting anywhere. Then when I pulled the alternator off to get to the oil pressure fitting I found I left off the earth on the alternator bracket. Fitted that and it was much better but clearly not perfect.
So no wideband yet and it’s a long way off being taken for a drive but it’s alive! Have run in the cam – thanks to all my neighbours patience as it’s not exactly quiet even with the rear resonator. Fingers crossed I haven’t wipe a lobe. And more luck than skill I also managed to jag the distributor timing close enough first go.
So it now starts and idles, and revs relatively cleanly. Engine fan kicks in as it should. Alternator is charging. And no leaks – yet.
Running but still have a long way to go.
Next job will be resetting the rockers again now that it has run for a bit. Still haven’t got a power steer pump for it yet either so that and getting the AC up and running will be the next challenge along with getting the tune close enough so it can be driven.