The ostrich is for a stand alone DIP style chip. If its flash then its not going to be compatible.
I'll describe what your looking for when locating tables. This is obviously tunerpro but the concept can be applied to any similar tool, including winols.
Firstly look at the bin in a hex editor. Your looking for gradual changes and blocks of similar data. Keep in mind that values may be 1 or 2 bytes wide. In this case its 1 byte which makes it a bit clearer.
This is an 11P bin, and we already know where the table is so its good to use as a learning exercise. So cheating, the spark table (for power mode) is at 0x7534. Its 20 rows and 11 columns.
So pretending we dont know that, we have a look with tools->advanced->hex editor
- finding tables in tunerpro 1.png (60.74 KiB) Viewed 12343 times
Looking at the data in the hex editor, we can see a block that looks like it may be a table, which Ive marked with green lines. This would be a guess, based on the fact that the data before it is 14 10 00 0B which is not smooth then it jumps up to 39 39 39 and has a bunch of smooth numbers... This could easily be wrong, but you need to start somewhere.
So then we look at the data 39 39 39 39 39 0E 0B 09 06 03 00 69 69..
From this we deduce that it is a slope because the numbers are decreasing and they are not all over the place. Then we jump back up to 69 69. So probably one of the axis is 11 bytes long (marked in red) which is the point where the constant slope ends.
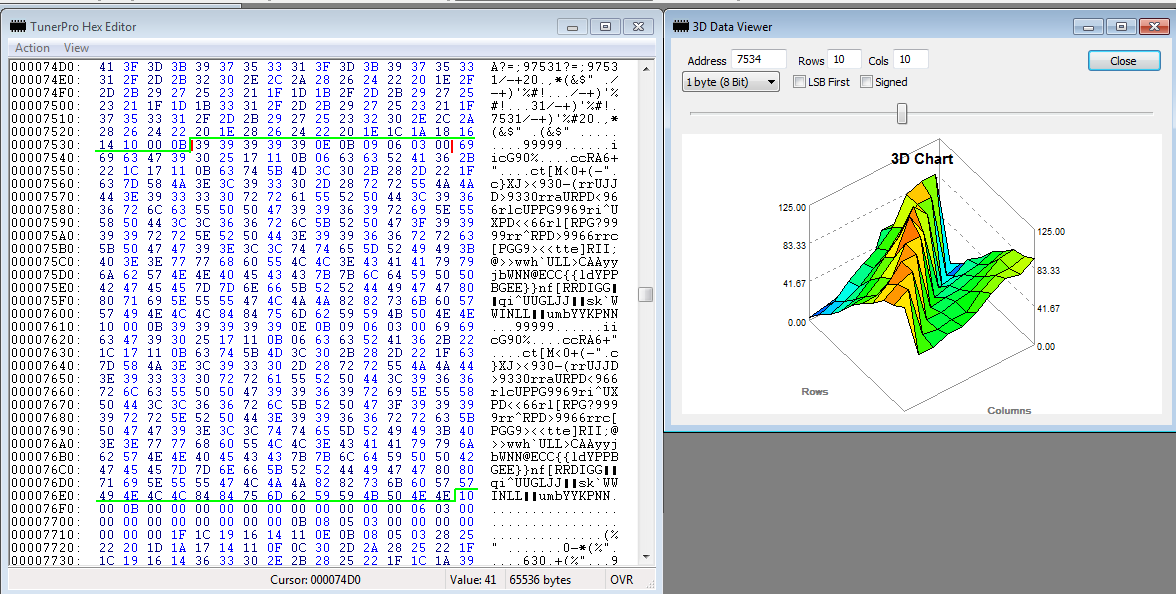
So we want to try and visualise this data to get it right. In tunerpro we go tools->advanced->3d data viewer. Set the address to our suspected start, rows to a total stab in the dark (10), and columns to 11. Ive put columns=10 in the first screen shot to show you in the screen shot what misaligned table data looks like. You can see there is a shape to it, but its offset diagonally. Thats a sign you are looking at a table but your number of columns is wrong. So l then bump the number to 11 from the analysis above. And then I bump up the rows a bit and it looks like the same table.
- finding tables in tunerpro 2.png (19.99 KiB) Viewed 12343 times
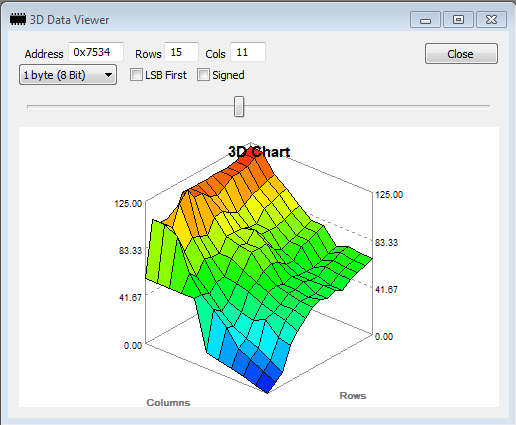
So, now were talking. We can assume columns=11 is right and rows is at least 15, probably more.
Can we validate the start? It looks like the first row does not match the rest in shape but it is sain for a particularly low rpm. I know from the xdf I already have that this is the right first row, but in a real session I would not. I could quite easily make an error here and discard the first row and start the table on the second row. In order to avoid this I would validate the findings against other factory tunes as they are less likely to have poor quality data than random tunes and hopefully decide the column is good.
So now the rows. We could keep incrementing this number by 1 until the newest row to appear looks wrong. But heres another way. We go back to the hex, and the green block I have marked spans from 7534 to 766E. So thats 766E-7534=13A bytes. Lets start working in decimal for these smaller numbers: 13A (hex)=314 bytes (decimal). 314 bytes / 11 (columns) = 28 rows. I set this and take a look and can see i've gone too far. Out of curiosity I kept going, up to 40. At 40 I can see what looks like 2 tables side by side. So, time to keep in mind that there is a second table here and it has the same number of columns (11). Bonus find! Whats more the 2 tables have the same shape, just offset. Since this application is for a VR which has power and economy modes, and because the shape is typical of a spark table it can be deduced we have found power and economy spark.
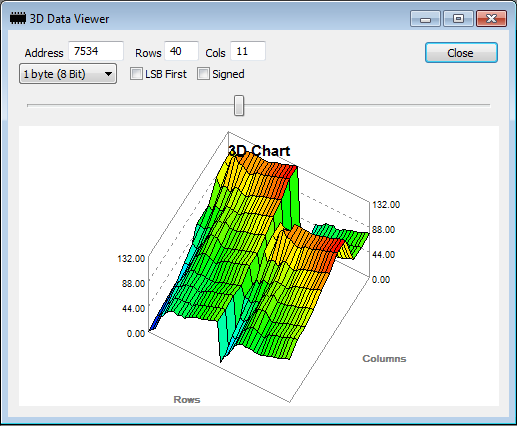
- finding tables in tunerpro 3.png (22.3 KiB) Viewed 12343 times
Some more experimenting shows 20 is probably the correct number of rows for the table I was originally looking for.
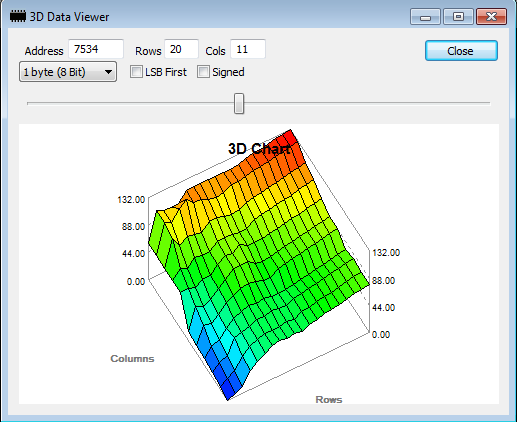
- finding tables in tunerpro 4.png (22.05 KiB) Viewed 12343 times
We can go back and try and define the other table later.
Now for Axis. This is hard one. It really helps to know what to expect from your manufacturer tables and typical equations for types of tables. I probably would have been better off showing a factory Holden bin, rather than 11P here... as less assumptions can be made for aftermarket code

But if it was original GM I'd go and take a look at other similar defined bins, and apply the same equation and check that degrees look sain, and apply the same headings once I had found another table that has the same resolution for the same purpose.
If someone has the disassembly skills they can find the references to this table in code and deduce more data by analysing that. This is often done, but is beyond the scope of this document. Anyway I hope this helps you and helps others understand the work involved. Ive been meaning to write an overview of this process for a while, so here it is! (i'll probably move it to a PDF later, and drop a link here instead).

